Friday 3 December 2010

Peace Bloggers Unite: Blogblast for Peace - Peace Bloggers of the World - The colours of peace

Peace Bloggers Unite: Blogblast for Peace - Peace Bloggers of the World - The colours of peace

A place to find fellow peace bloggers!

Thursday 4 November 2010

Dona Nobis Pacem

Thursday 7 June 2007

How to alter picture height and width

There's two ways to make a picture the right size for the sidebar.

1) The first is to import it into blogger in the smallest size. I often import the bigger one for a post, and a small one for the sidebar, then once I've got the 'address' of the small one, I either delete it, or copy and paste the html for it into a permenent 'draft' post.

or

2) The second way, that I know of, is to specify the height and width in the sidebar blurb. After the closing of the quotation marks, but before the closing 'V' shaped brackets, write

height="" width=""


I've found the width of my sidebar is about 200, and to keep the picture in proportion, I usually use a width of 150:


Tuesday 5 June 2007

Dona Nobis Pacem

Saturday 21 April 2007

Making your own Peaceglobe

.

So, have you got the Blogblast for Peace feeling? Want to make your own Peaceglobe, but aren't entirely sure how to go about it?

OK, then this one's for you...

1) First of all, you'll need a globe to work with. These can be found at Mimi Lennox's (the originator of the 'Blogging for Peace' movement) Mimi Writes. You can either get it through this link, or you could follow the links from my sidebar:


2) Next is the, oh so hard, task of choosing between the four different Peaceglobes available this time round.


If you just want to sign your name, you could use the image on this page here, by right-clicking on the smaller image. [Also, if you have a dial-up internet connection that can't cope with bigger files]:


However, if you want to do any fancy stuff with your globe (as I've done below, adding pictures and writing) then

  • left-click your choice, and it will take you to the page where the picture is huge.
  • Copy this image by right-clicking on it.
  • Scroll down the bar until you get to "Save image as"
  • Left-click "Save image as"...


  • ...and save the image as something obvious, like 'Peaceglobe 6th June'. Best place to put it is somewhere you can find it easily. Perhaps in the folder 'My Pictures' or 'My Documents' (in the pictures below, I've blanked out all the contents of my folders for privacy, just in case you're wondering why it looks funny :-) )


3) Once you have the globe saved, you're ready for the fun part - personalising the picture!

I don't know what your computer graphics program is, but on many computers that came with Microsoft Windows there is a program called "Paint". This is the program I use most often. It isn't a complicated program, nor can it do as many things as programs such as "Photoshop", but it's good to demonstrate a simple globe-making.

  • So, to see if you have "Paint" on your computer, left-click the Start button at the bottom left of the screen:


You might find there is a shortcut in your pop-up list:


  • But, if not, then left-click "Programs", just above the 'Start' button
  • Left-click "Accessories"
  • and, hopefully, you'll find "Paint" in the drop-down list here, then double-click on it.


4) In the open Paint window (which might have a full white screen), you now want to bring in the Peaceglobe picture you saved earlier. I find the easiest way to do this is to click 'Edit' at the top of the page, then scroll down to the bottom of the list that opens until you get to 'Paste From'. Click on this:


5) Find your Peaceglobe picture in the files, wherever you put it (I put mine in 'My Documents', then in a file called 'Blog':


6) Once you have your picture in front of you, you can use all the tools to draw, write or bring in and place a picture (if you are having trouble with this, or haven't got time to experiment, let me know, and I'll try to show you how...)


7) Word of warning:

Often, when you open a picture file in Paint, it brings it in to fill the size of the screen, or even larger! I usually find I have to resize it.

(Don't click anywhere on the page until you've finished messing with the size and position, because that will fix it.... but, if you do make that mistake, go to the top of the page, click on 'Edit', then 'undo' and start that bit again.)

If you left-click the button that says "Image" at the top of the page, this box will come up:


Click on "Stretch and Skew" in the list. This is how you can re-size any picture you bring in, or turn it, if it needs turning.

If I want to make it smaller, you will need to think of roughly how much. To make the picture half sized, you would write '50' [as in half=50%, quarter=25% etc] in both the horizontal and vertical boxes of the "Stretch" section at the top (ignore the "Skew" section - it's not needed).

If I am using the picture to go round the edge, I'll make it about 15% and then downsize it to fit, dragging the corners, once it's on the page.

(It's better to make it too big than too small, because if you try to enlarge it after shrinking it, it will have lost a lot of it's definition.)


For my Peaceglobe (now in the sidebar), I used the 'paste-from' many, many times, bringing in each coloured flower picture individually, then re-sizing them, and placing them round the edge of the picture.

[Oh yes, to put the flowers round the top and left edge, I shrunk the original picture to 96%, which left a white border. Then I selected the picture, and moved it to the centre of the white space. If you're confused about this, ask... I'll explain elsewhere :-) ]


8) After putting the flowers all round, I created some text-boxes to write my name and message.

You can either:

  1. Write your whole message in one text box, as Akelamalu has in her sidebar here.
  2. Make seperate textboxes directly on the page
  3. Open another "Paint" program, do the text boxes there, and cut the bit you want and paste it onto your globe. (This has the advantage of being easier to resize, using the corner handles, to make it fit and look better.)
Re. Text boxes: If you right-click on the paintbox colour, you can change the background colour of the text, as I have here:


9) Now, whatever you do next, save first!!

Go to the top left corner, click 'File' then 'Save as'.


10) Choose a name and place similar to the first Peaceglobe picture, so you remember where you put it, giving it a name that shows you're ready to Blog it! (eg, on mine I simply added "- For Blog")

Also, make sure you save it as a '.jpeg' or 'jpg' file... if it isn't on this selection in the very bottom 'drop down' box (it might be on save as '.bmp' etc file), then click on the arrow to the right of this box, and choose the correct type... the difference is that the .bmp files are more detailed but the jpeg files tend to be easier to move around, email and post.


Now, you're ready to put your picture up, so go to the next post Putting your Peaceglobe in the Sidebar


.

Putting your Peaceglobe in the sidebar

.

So, your Peaceglobe is done, and you want to put it in the sidebar... You are, rightly, proud of it, and can't wait until June 6th to show it...

1) First of all, you have to get your peaceglobe off your computer and onto the internet. If you haven't got blogger, it should be a similar process.

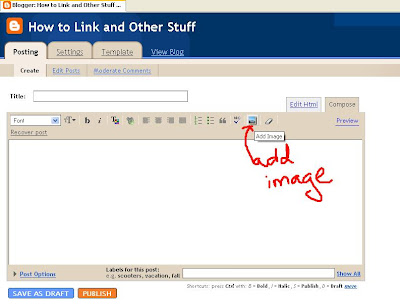
In Blogger, you have to upload the picture into a post before you can do anything else with it, so open a 'New Post' box, and click 'add image' icon (the little picture):


2) Click 'small' for image size, and 'centre' for position, then click where it says 'Browse':


3)
Find your peaceglobe where you cleverly saved it so you wouldn't forget, double-click on it, or click on it then use the 'open' button of the dialogue box:


4) To make the picture a permenent file in Blogger, you then must publish this post... (don't worry, you don't have to leave it there - once you've got its location, you can then delete it, or re-save it as 'draft' for later use):


5) Next, go to your blog (you can do this in a seperate window or tab, if you find that easier):


6) Right-click on your peaceglobe picture, scroll down the list until you get to 'properties' and left-click:


7) Copy the location of the picture (an easy way is to triple-click on it):


8) Go back to the blog dashboard, and click the 'Template' tab:


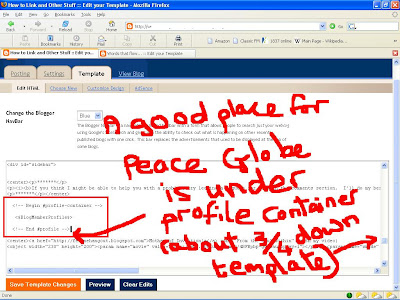
9) Now, to find a good place in the sidebar to put your Peaceglobe....

Two choices that might be popular are just beneath the profile container, or at the very top of the sidebar.

Either way, use the scroll button on the right to move to about 3/4 down the template. The sidebar is around here somewhere, so slow down until you find something that looks like this (click to enlarge)::

either...


or...

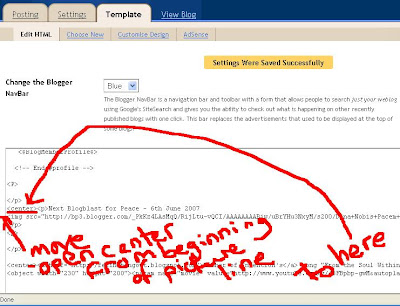
10) I usually start off with putting in paragraph code. When you use the 'open paragraph' and 'close paragraph' codeat the beginning and end of a piece of writing, or a block with writing and an image (s), then it will seperate what's within the code from whatever else is on the page. (I can't write this code here, or it will treat whatever I put between it as a paragraph, but you won't actually see the code, so look for the 'p' and '/p' within the 'v-shaped, sideways brackets):


11) Write the 'open-' and 'closed-' paragraph code, pressing 'enter' twice in between, so they are on different lines.

12) Now you are almost ready to 'paste' the Peaceglobe location you copied a little while ago. First, though, there's some more code that needs to be there (enlarge the follow picture, by clicking on it, to see the code better). Within another set of those sideways-V brackets, you need to write

img src=""

This is giving instructions that what follows at the location you're going to put here is a picture:


13) Once you've typed in the code for an image, the next thing is to paste the location of your peaceglobe you copied at 7). Find the two "" and place the cursor in between, then paste (either right-click and choose 'paste', or press the ctrl and V buttons together):


14) Now, to neaten up the picture, so it's central ( you don't have to do this step, if you want the picture to the left of the sidebar to line up with anything else you have there).

Place the word (in those sideways-v brackets) center at one end of the line you've just written in...


...and /center (in those same brackets) at the other end:


15) Sometimes, I'll use the open and close paragraph code, with spaces in between, to add a space between a picture or block of writing, and the other stuff in the sidebar (but it hasn't proved to be the most effective method... I'm still working on this problem):

16) Another thing you can add is some writing, maybe an explanation of the Peaceglobe picture. You can put this above or below the picture, before or after the paragraph code... depending on how you want it to look. I've written a simple explanation here - what and when:


17) Now, before saving, it's a really good idea to check what it looks like, and make sure it's up there in the sidebar where you want it to be.... use the 'preview' button at the bottom left of the template. When you've looked, use the 'back arrow' at the top of the page to return to template:


18) If everything looks OK, then comes a REALLY IMPORTANT bit (which, I have to admit, I've forgotten in the past) -

SAVE!!!!


19) One thing I found wasn't to my satisfaction when I did the preview was that the picture was centred, but the writing above it wasn't, so I moved the 'center' code to before the writing:


Save again, after any changes.


So, this is what mine looked like:


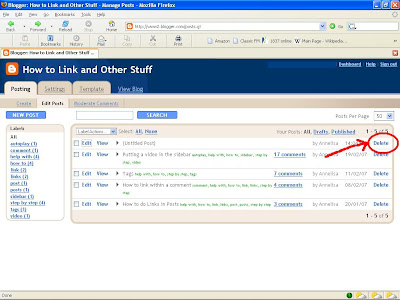
20) The last thing to do is to 'disappear' the original picture you published at the beginning. This can be done in two ways:

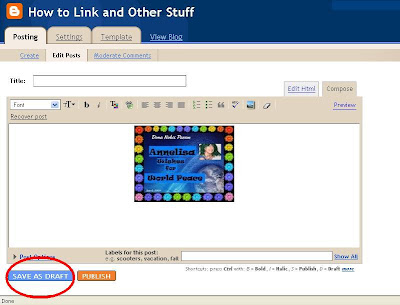
  • By returning to the post, using the 'edit posts' button, and clicking 'edit' on the last post you did, the clicking 'save as draft' - this will retain the picture for future use, if you want it:


  • or, if you don't foresee needing the picture again (you can always use the location address from the template if you need it, or upload it again from scratch) when you've clicked the 'edit posts' button, you could simply delete that whole post:

And that should be that (I hope) unless I've forgotten something essential... :-D

Good luck!

And...
don't forget to send Mimi a copy of your globe in an email (on her profile page), so she can add it to her globe gallery!!


.

Monday 19 February 2007

Putting a video in the sidebar

Ok, so how do you put a video in the sidebar, such as the one under my profile on the right?

I'll do my best to take you through the steps... hopefully I haven't missed out anything. I've included everything I can think of (including some things that might seem obvious)

*Let me know if there's something you get stuck on, and I'll see if I can find out why...


(1) Go to the page where the video is, and highlight the 'embed code' (highlighting is automatic in YouTube when you simply click on it).


(2) Then Copy the code. The easiest methods to copy the codes are:
  1. Hold down control key (that says 'Ctrl' bottom left of keyboard) and then press 'C' or
  2. Right-click on highlighted embed code, and scroll down to where it says 'Copy' and left-click


(3) Go to the blog 'Template' page:


I've played with this page quite a bit, so I'm quite familiar with it now, but I remember it as being quite daunting when I first started. Don't worry about it... it gets easier the more you play :-D


(4)
Scroll down the Template box until you reach the bit for the sidebar. On my blogs it has usually been about 3/4 way down the template page (if you're looking at the scroll-button on the right of the box...) above the 'profile' bit.

This has usually been helpfully 'titled' by the person who designed the template. Here I've underlined it in red for you:


(5)
Scroll down just a little bit further, to immediately after the profile container shown here:


(6)
Click in the space below the profile container and Paste the embed code into the template (it's ok to make a line space or two before and after the video code, as the spaces don't show up... This helps to identify it later, if you want to do more to it)

Two easy ways to paste are:

  1. Right click on the page, and scroll down the pop-up until 'paste' and left-click.
  2. Hold down the control key, and press 'V'.
[When the video code is pasted in, the cursor pops up at the end of the line, and it seems to suddenly 'change' the page. Don't worry - it's a long line of code, and has just gone a long way to the right! First time I did this, I thought I'd erased all the rest of the template, which seemed to have disappeared!! :-) ] :


(7)
If you were to take a look (clicking on the 'preview' button at the bottom of the box) the video would be huge - as big as it is on the YouTube page, so next you will want to make it smaller.

Twice within the code, you've just pasted in, are instructions on how big it should be. This can be adapted to however big you want. For the sidebar, you'll obviously want it a lot smaller, or it will make the sidebar pop down to the bottom of the page after all the posts!!!

Within the line of code you've just put in (go back to the beginning of the line using the left cursor key) look for the bit that says object width="425" Height="350"


(8)
I've found that changing the Width to 200 and the height to 180 seems to fit pretty well:


(9) Repeat for the second place in the code it mentions width and height
:


(By the way - at the end of the line of code is that little tag I mentioned in my previous post that can cause trouble when putting it into the main post):


Adding a Title


(10)
In my sidebar, you'll see I haven't simply put the video in. If you don't want a title, skip ahead to step (12)

I put in the title just above the video code just put in.

Using the same 'link tags' (which I can't put in here as blogger will then link whatever's in the post here) I talked about in the previous post I linked Mother of Invention's name as part of the title.


(11)
Then added the words

song "From the Soul Within" (with my video)

You can write anything, and it will appear on the sidebar:


(You can also place your writing just as easily after the video code, so it appears underneath)


Center the Video


(12) If you want to center the video (or anything else you put in the sidebar, for that matter) it is a simple matter of using the center tag we saw in the previous post. Place an [open center] tag before the code (and any other writing you've added):


(13)
...and, of course, close the tag after the code, or everything else on the sidebar will be centered, whether you want it to be or not!


Want the Video to come on automatically when someone arrives at your page?

If you don't want it to play automatically, then go on to step (16)


(14)
In the same way there were the width and height instructions twice in the video code, so there are two places you will need to add code to make the video play when someone arrives at your page. Both times, it looks like a web-page url:


At the end of this bit, still within the quotation marks "" add this:

&autoplay=1


(15)
(Don't forget to add this same code again, towards the end of the video code):


*** Vital ***


(16) SAVE!!!
Click on 'Save the Template Changes' button.


So, this is what it looks like when you go to the blog:

Labels: , , , , ,